Contents
- Home
- Interrupts 101
- Subreddit Monitor
- Reference
- Resistors
- Serial
Serial
Your Arduino program can send messages to your computer as well as receive messages from it.
On the Arduino side, your program uses a "variable" called Serial to send and receive messages to/from your computer. Every Arduino has a Serial "port" some have multiple ports. For example, the Arduino Mega has four serial ports and thus has four Serial "variables". These are named Serial, Serial1, Serial2 and Serial3. They all work the same way except for the fact that they are connected to different physical pins on the Arduino board. One of them, Serial, is connected to the USB cable.
On the PC, you can use the Arduino IDE's Serial monitor to monitor any messages that are sent via the USB.
The Serial Monitor is included as part of the Arduino IDE.
You can use any terminal emulator in place of the Arduino IDE's Serial monitor. Examples include putty, teraterm, Serial Debug Assistant and many more.
In addition to using terminal emulators, programs running on your computer can interact with your Arduino. You can use any language that supports communications with the serial port. Examples:
- C/C++
- Java
- Python
- Shell scripts
- processing
- and many many more
The "Home Security" project listed in the examples is one such project that uses a python script to manage communications between an Arduino and the Agent DVR video security package.
Initialising the Arduino's Serial port
Before you can use the Serial Port, you have to initialise it. The following example shows one way to do this. The initialisation is placed into the setup() function.
void setup() {
  Serial.begin(115200);         // Initialise the Serial port to 115200 baud

  while (! Serial) {            // Wait for the port to initialise.
    delay(1);
  }
                                // Send the message
  Serial.println("Serial port initialised.");   // Once initialised, you can print to it.

  // Other setup code can go here.
}
Note that the Serial.begin(115200); has the value 115200 passed as a parameter. You need to ensure that you make the same selection in the drop down at the bottom right of the Serial monitor labelled baud.
Also note that you cannot just make up any number you like for the baud, you have to choose one of the valid values that appear in the drop down.
If you are using a Leonardo or micro or similar you might want to use a more advanced version of the initialisation that will still work if you don't have the data connection via USB to a computer.
void setup() {
  Serial.begin(115200);         // Initialise the Serial port to 115200 baud

  int cnt = 1000;
  while (! Serial && cnt--) {  // Wait for the port to initialise, but give up after 1000 delays.
    delay(1);
  }
                                // Send the message
  Serial.println("Serial port initialised.");

  // Other setup code can go here.
}
Sending messages to your computer
The easiest way to use the Serial Monitor is to display messages that your Arduino sends to your computer.
There are two main functions that you can use to send messages to your computer. These are:
- Serial.println() - print a message and advance to a new line.
- Serial.print() - print a message but do not advance to a new line.
You can read more about the Serial device in the online documentation.
Both of the print functions work the same way, the main difference is that the first one moves the cursor to a new line. The second function leaves the cursor at the end of the last character printed, so the content of the next print statement will follow on from the last character of the previous output.
Following is a short program that illustrates some of the ways that the print statements can be used.
void setup() {
Serial.begin(115200); // Initialise the Serial port to 115200 baud
while (! Serial) { // Wait for the port to initialise.
delay(1);
}
// Send a title message and move to a newline.
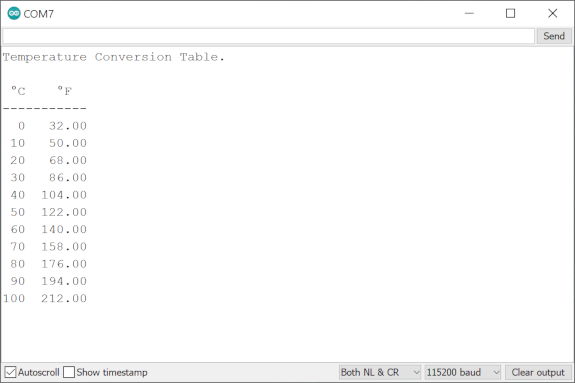
Serial.println("Temperature Conversion Table.\n");
/* Strings (the messages in the quotes) are stored in SRAM.
* SRAM is fairly limited in size compared to Program (or Flash) memory.
* The F macro causes the string to reside in Program memory. It is handy
* but not required to use F for strings used with println (which can
* process them correctly) as this frees up the limited SRAM memory for
* more important things.
*/
Serial.println(F(" °C °F"));
Serial.println(F("-----------"));
// Loop through our celsius values starting at 0 and ending at 100.
// Increment by 10 each time (c += 10).
for(int c = 0; c <= 100; c += 10) {
double f = c * 9.0 / 5.0 + 32.0; // Convert to Farenheight.
spacing(c); // Output some leading spaces so our celsius values align.
Serial.print(c); // Output the celsius value - but stay on this line of output.
Serial.print(" "); // Print some space to seperate the columns - again remain on this line.
spacing(f); // Output some leading spaces so the Farenheight values line up.
Serial.println(f, 2); // Finally output the farenheight value with 2 decimal places and move to a new line of output.
}
}
void loop() {
// Nothing to do here in this program.
}
/**
* Function to output some leading whitespace depending upon the number of digits
* in our number.
*
* The output cursor does not advance to a newline.
*/
void spacing(int n) {
if (n < 10) { // N has only one digit, so output 2 spaces.
Serial.print(" ");
} else if (n < 100) { // N has two digits (10-99), so output 1 space
Serial.print(" ");
} // Otherwise don't do anything.
}
The output of the above program looks like this:
You can read more about the Serial device in the online documentation.
Receiving messages from your computer
You can also use the Serial monitor to send messages to your Arduino.
This topic will be covered in a future update.
You can read more about the Serial device in the online documentation.