Contents
Example Projects
On this page, lets look at a few projects I have previously worked on to get a flavour of what is possible and what we can cover in upcoming installments if there is sufficient interest.
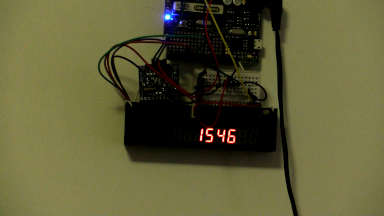 |
Wall ClockThis is a digital clock with a dimming display. A light level sensor monitors the ambient lighting and adjusts the display brightness. That is, when the room is dark, the display will dim. As the room brightens, the display will get brighter. The project uses a real time clock (RTC) and an 8 digit display module. An interesting aspect of this project is how the RTC and display communicate with the Arduino. One uses IIC which is also written as I2C and I2C. The other uses SPI The display module is based on a MAX7219 IC (Integrated Circuit). Thanks to the MAX7219 can manage the entire display with just 3 wires connected to the Arduino. This creates an interesting contrast with the next project where the Arduino manages the display directly. |
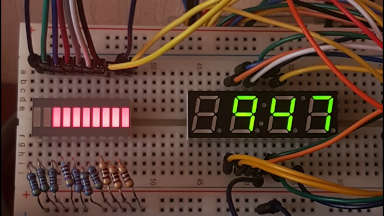 |
Countdown ClockThis project is also a clock. It features an LED bar graph display that counts down to a certain date. Unlike the previous project, this project does not have any external hardware, specifically the MAX7219 IC, to manage the display or bar graph for us. As there is no external hardware support to manage the displays, display management must be directly handled by the Arduino. That is, every single LED (not just every digit, but every LED in every digit and every led in the bar graph) is turned on or off by the program running on the Arduino. The fact that we must manage the displays by ourselves, gives rise to these interesting aspects of the project:
|
|
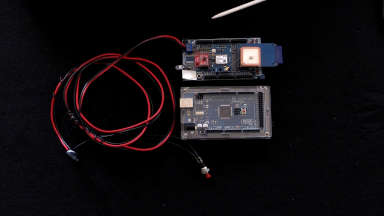
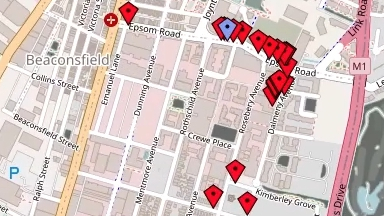
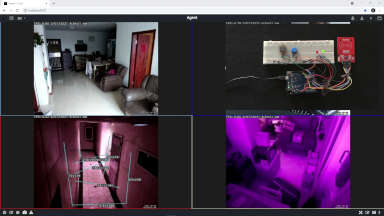
Road Surface MonitorThis project is an example of data collection combined with data visualisation. The top image shows a device featuring:
The purpose of this project is to autonomously capture data about the quality of a surface - in this case the surface of roads. The device is installed in a motor vehicle which is then driven around. As the vehicle is being driven, the MEMS device reports various movement parameters such as G-Forces and roll motion. The G-Forces are an indication of bumps such as potholes. The roll motion is an indicator of undulations, you can think of undulations as a gentle rocking back and forth - rather like a boat on a lake may encounter as it rocks back and forth on a lake. The GPS provides the location where the MEMS data points (motion) was observed. Both the MEMS data and GPS data are written to the SD card for later processing. The data captured on the SD card is processed into a format that can be overlayed onto a map (the lower image). This processing also examines the stream of data looking for points of significance (e.g. an impact that exceeds a certain G-Force) and includes annotations which show on the map. Finally there is also a button attached to the Arduino. If the operator wants to flag a particular location for some reason, they can press the button. This action inserts a special entry into the journal on the SD card. The aforementioned processing can show these flagged locations on the map. The second image is an example of a map generated by this project. The blue marker is an example of a button press, the red markers are bumps in the road (it was a bumpy area due to construction). |
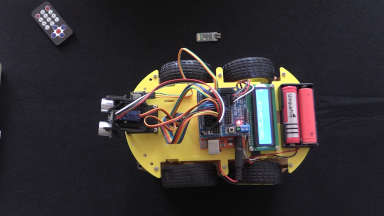 |
Semi-Autonomous CarThe semi-autonomous car is a commercially available kit. It features a number of sensors and modules to coordinate the activities of the car. The modules include:
Combined, all of these modules allow you to send commands to the vehicle, such as "go forward", "turn left", "stop" and let it "do its own thing". These commands can be sent via bluetooth and/or an Infrared remote control. The autonomous capabilities are collision avoidance and line following. When collision avoidance is enabled, the ultrasonic range finder is used to detect obstacles in front of the vehicle. If it gets too close to an obstacle, it will automatically stop. When this happens, a servo attached to the range finder allows it to rotate the range finder left and right. In so doing, the vehicle is "looking" for an alternative path and will automatically adjust its course (i.e. turn) to avoid the obstacle. In line following mode, sensors mounted under the body of the vehicle will attempt to follow a line marked on the surface that the car is operating on. |
 |
Home SecurityThis project is an integration of multiple systems including:
|
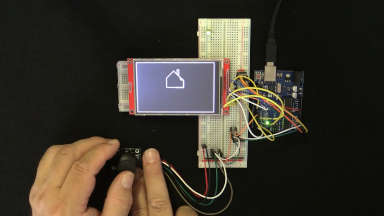 |
SketchingA fun project using a TFT display to draw an image. The image is defined by the user who operates a joystick to control the movement of a "pen" on the display.
This particular project was inspired by an age old toy called
Etcha-Sketch. The original Etcha-Sketch featured a "display"
with some sort of silver powder on it. Two control knobs where
rotated controlling the movement of a stylus which "scratched"
the silver powder from the "display" thus allowing the operator
to construct an image (of sorts).
My plan is to extend this into a playable game inspired by a retro arcade game that is yet to be selected. |
 |
Yatzy DiceThis project is a set of five electronic dice. It features a number of buttons to "lock" die values in place, roll the (unlocked) dice and reset the board for the next player's turn. It can be used to play a game such as Yatzy or any other multi-dice game.
As it stands this project uses 40 LEDs and 7 push buttons. An
Arduino Uno, being the device I used here, only has 18 available
pins - or put another way, not enough pins to control that many
things. So, I employ some helper Integrated Circuits to manage
the LEDs. This reduces the wiring to just
3 wires to control all of the LEDs and 7 wires
for the buttons - a total of 10 wires all together.
While the wiring may look a little bit complicated, it is only because the same circuitry is replicated 5 times. Indeed, the individual die circuit can be replicated any number of times allowing you to add on as many dice as you like - subject of course to there being enough power (milli-amps) available to power the monster! |
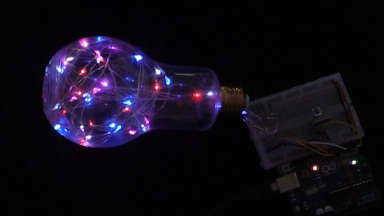 |
Artistic Light BulbThe final project that I want to highlight - I have more, but this is probably enough for now - is an artistic light bulb. I think the idea struck me when we finished a box of chocolates that is shipped in a somewhat nice clear plastic box. My thought was "I could put fairy lights in this and blink them with interesting patterns". And that is what I did. This particular installation is in a "light bulb" shaped container originally used for drinks. I have no idea why they put drinks into a light bulb container, and it wasn't that great a drink but the container is perfect for this project. Another container I have used is PET soft drink bottles which also work quite well. This project is interesting from a software point of view and includes a number of techniques including:
|