Contents
Button connection and State Machines
In this step, we will connect the button and remove the delay function. Blinking will be handled by a very simple state machine and the "system clock".
As a general rule, use of the delay function is not considered best practice. The reason for this is primarily that, with a couple of (advanced) exceptions, nothing will happen when the delay is active. You can see this by the almost random non-responsiveness of the button in versions of the code where the delay function is used.
The circuit
Connect the button as per the following diagram and accompanying
instructions:
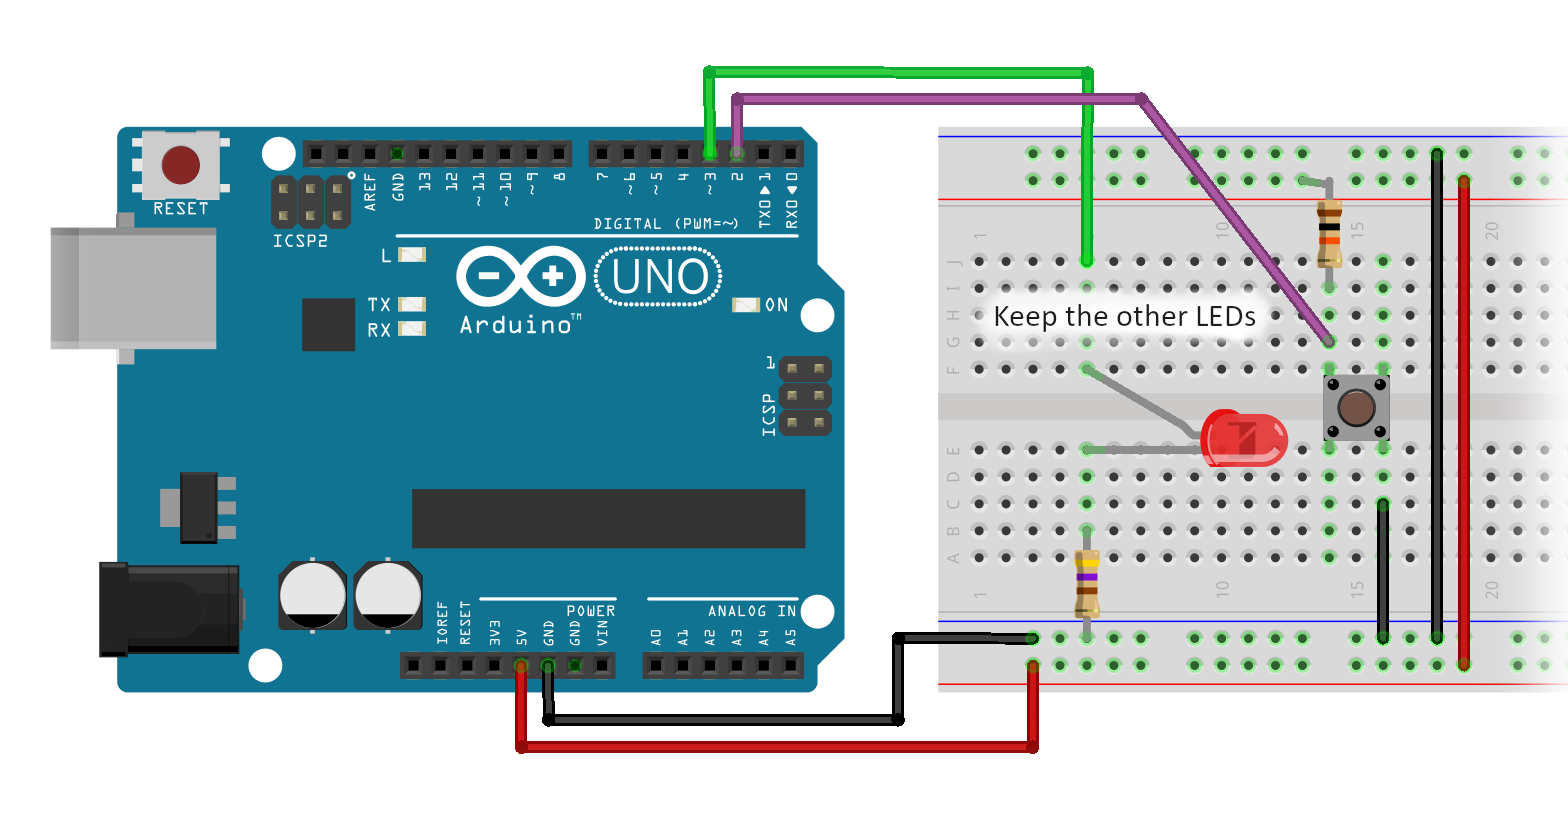
- Disconnect the power to the Arduino.
- Use a red wire to connect the 5V pin on the Arduino (VCC) to the long "bus" marked with the red line on the breadboard.
- Optionally, bridge the red VCC bus on each side of the breadboard (use a red wire).
- Optionally, bridge the blue (or black) GND bus on each side of the breadboard (use a black wire).
- Insert the button into the breadboard.
- Connect one side of the button to the GND bus - preferably use a black wire as this is a ground connection.
- Insert a 10K Ω resistor so that:
- One side connects to the red VCC bus.
-
The other side connects to the button.
Remember, the resistor must be connected to the button using a pin that is diagonally opposite to the button's GND connection. - Connect a wire of any colour (except red or black) from between the
resistor and the VCC side of the button to pin 2 on the Arduino.
This is the purple wire in the diagram above. - Double check your connections - especially the VCC and GND lines to ensure that they never directly connect under any circumstances.
NB: this assumes that you have a button that is internally wired as per the diagram I draw in the video.
If in doubt, consult your button's data sheet and/or use a multimeter to measure how the pins in your button are connected.
Note that in the diagram, I only show a single LED, but this step will work better if all seven of the LEDs are connected as indicated in the previous exercise.
LED animations that cycle on button press
Modify the code so that it matches the following. The code looks quite
long but more than half of it is comments - which you don't have to enter.
Alternatively, just copy and paste the following code into your IDE:
/**
 * MyBlinkWithDelay
 * ----------------
 *
 * This program introduces a button and four different animations for the LEDs.
 * When the button is pressed, the program will cycle to the next animation.
 * The animations are:
 * - Blink all the LEDs off and on.
 * - Strobe the LEDs one by one to the left.
 * - Strobe the LEDs one by one to the right.
 * - Do nothing.
 *
 * There is a problem with the program though. The issue is that when the button
 * is pushed, the animation will not advance unless the button is held down until
 * the currently running animation completes one cycle.
 *
 * This problem occurs because we are using the delay function. The reason that this
 * is a problem is because when we use delay, we are basically throwing away time.
 * In this case while we are throwing away time with delay, we are unable to check the
 * state of the button.
 *
 */
const int LED0 = 3;
const int LED1 = 5;
const int LED2 = 6;
const int LED3 = 9;
const int LED4 = 11;

const int BUTTON = 2;

/*
 * Following is the list of pins that you have connected the LEDs to.
 * If you follow my connections, then the LED array will be set
 * correctly. If you have used different pins for the LEDs then
 * you will need to list the pins that you have used in place
 * of my pin numbers.
 */
const int LED [] = {
  LED0, LED1, LED2, LED3, LED4, 12, 13
};

/*
 * Calculate how many LEDs are in the LED array.
 * The formula is the size of the array in bytes - currently 7 elements
 *   multiplied by 2 bytes per element = 14 bytes.
 * divided by the size of the first element (2 bytes).
 * Results in 14 / 2 = 7 elements. So NUM_LEDS is 7.
 */
const int NUM_LEDS = sizeof(LED) / sizeof(LED[0]);

/**
 * Setup the hardware environment.
 * - All LEDs are set as outputs.
 * - The BUTTON is set as an input.
 */
void setup() {
  for (int idx = 0; idx < NUM_LEDS; idx++) {
    pinMode(LED[idx], OUTPUT);
  }
  pinMode(BUTTON, INPUT);
}

/**
 * Blink all of the LEDs once.
 * The blink is on for one second and off for one second.
 */
void blinkOnce(boolean initialise) {

      // Turn all the LEDs on.
  for (int idx = 0; idx < NUM_LEDS; idx++) {
    digitalWrite(LED[idx], HIGH);
  }
  delay(1000);      // Pause for 1 second (1000 milliseconds).

      // Turn all the LEDs off.
  for (int idx = 0; idx < NUM_LEDS; idx++) {
    digitalWrite(LED[idx], LOW);
  }
  delay(1000);      // Pause for 1 second (1000 milliseconds).
}

/**
 * Take no action.
 * This function simply delays for 1 second.
 */
void noAction(boolean initialise) {
  delay(1000);
}


/**
 * Strobe the LEDs to the right one time.
 * In this context, "to the right" means starting with the
 * first LED defined in the array, turn it on.
 * delay briefly then turn on the second LED and turn off the previous (first) LED.
 * Then delay briefly and turn on the third LED and turn off the previous (second) LED.
 *
 * So, in general, turn on an LED, turn off the previous one (to the left in the array) and
 * delay briefly.
 * There is a special case with the first or leftmost LED in the array.
 * In this case, the previous LED is the rightmost LED.
 */
void strobeRight(boolean initialise) {
        // Step through the LEDs one by one.
  for (int idx = 0; idx < NUM_LEDS; idx++) {
    digitalWrite(LED[idx], HIGH);               // Turn on *this* LED.
        // Work out the previous LED that must be turned off.
    if (idx > 0) {                              // If we are not at the first LED
      digitalWrite(LED[idx - 1], LOW);          // Turn off the LED to the left of *this* LED.
    } else {                                    // otherwise,
      digitalWrite(LED[NUM_LEDS - 1] , LOW);    // Turn off the last (rightmost) LED.
    }
    delay(200);                                 // Pause briefly.
  }
}

/**
 * Strobe the LEDs to the left.
 *
 * This is basically the opposite of Strobe right.
 * The difference is that the "first" LED is the rightmost LED defined in the array.
 * The next LED in sequence will to the left of the LED just worked on.
 *
 * The special case is that when we turn on the rightmost LED (i.e. the first LED)
 * the leftmost LED is the one that is turned off.
 */
void strobeLeft(boolean initialise) {
        // Step through the LEDs one by one.
  for (int idx = NUM_LEDS - 1; idx >= 0; idx--) {
    digitalWrite(LED[idx], HIGH);               // Turn off *this* LED
    if (idx == NUM_LEDS - 1) {                  // If we are at the first LED (NB this is the opposite test of strobeRight)
      digitalWrite(LED[0], LOW);                // Turn off the last (leftmost) LED.
    } else {
      digitalWrite(LED[idx + 1], LOW);          // Turn off the LED to the left of *this* LED.
    }
    delay(200);                                 // Pause briefly.
  }
}


void loop() {
  /*
   * The following variables are declared as static.
   * What this means is that they are initialised one time only.
   * The value that they are set to will be remembered across
   * subsequent calls to loop.
   */
static int mode = 0;                // Defines what animation we are currently performing on the LEDs
static int prevBtnState = HIGH;     // Tracks the state of the button the last time we checked.

  /*
   * This variable is not declared as static.
   * Every time we enter the loop function, this variable will be
   * reinitialised.
   * Put another way, the value assigned to pressEvent is not remembered
   * across subsequent calls to the loop function.
   */
  boolean pressEvent = false;

  int btnState = digitalRead(BUTTON);
  if (btnState != prevBtnState) {
    prevBtnState = btnState;
    delay(10);
    if (btnState == LOW) {
      pressEvent = true;
      mode = mode + 1;
      if (mode >= 4) {
        mode = 0;
      }
    }
  }

    /* Perform the animation as defined by the mode indicator
     *
     * Note the double equals sign used here. A single equals is the
     * assignment operator. A double equals is a comparison.
     *
     * A common error is to use a single equals in an if statement. There
     * are certain cases when it is useful to use a single equals in an if
     * statement, but in this case it will not produce the correct result.
     * In summary:
     * if (mode == 0)    is mode equal to 0? If so, perform the "true" part of the if.
     * if (mode = 0)     assign 0 to mode and in this case **do not** perform the "true" part of the if.
     *
     * if (mode == 1)    is mode equal to 1? If so, perform the "true" part of the if.
     * if (mode = 1)     assign 1 to mode and in this case **do** perform the "true" part of the if.
     *
     * As can be seen from the above the single equals produces a different outcome and changes the value
     * of mode. While the result of the if appears to be random, it does actually follow some rules, but
     * we will leave that for a future episode.
     *
     * For now, just be sure to use a double equals in your if stateents.
     */

  if (mode == 0) {
    blinkOnce(pressEvent);
  } else if (mode == 1) {
    strobeRight(pressEvent);
  } else if (mode == 2) {
    strobeLeft (pressEvent);
  } else {
    noAction(pressEvent);
  }
}
Button and animations with state machine
As it mentions in the opening comments, there is a problem with the program above in that it is often unresponsive when the button is pressed.
This is caused by the use of delay. So, the solution is to not use the delay function. But simply deleting the delay isn't enough because then the program will run so fast that the animations will just become a blur. Feel free to try just deleting the delay function calls to observe the effect.
If you did simply delete the delay calls, you may find that the button
press skips one or more animations. This is due to a phenomenon known
as bounce. At a high level, bounce occurs because buttons and switches
are mechanical devices. As the button is pressed or released, it will
momentarily make and break the connection - possibly multiple times.
This can result in multiple button presses being very quickly recorded
by your Arduino's program.
The solution to this is known as debouncing the button.
To properly resolve these things, we need to implement a basic state machine. A state machine is something that:
-
Defines a number of states that something can be in.
In the case of blinkOnce, the LEDs can be on or off. This is tracked using the turnOn boolean variable. -
Defines the valid transition between the different states.
In the case of the blinkOnce function, it can transition from ON to OFF and it can transition from OFF to ON. What to do is determined by the turnOn variable. Once the transition occurs, the turnOn variable is set to the opposite state. That is, if we turn on now, then next time we will turn off. -
Defines the trigger(s) that can cause the transition.
In the case of the blink once function, the transition is triggered after a period of time has elapsed. This is tracked by comparing the current "system time" provided by the millis() function to the nextStepTime variable value. If the time difference is one second (1,000 milliseconds) or more, then we will transition the state of the LEDs as described above.
The mode variable in loop also represents a state machine. Its value determines which animation to run. Its transition occurs when the button is pressed.
Finally, the button handling is in a third state machine. The purpose of this state machine is to eliminate any spurious "bounces" of the button. This state machine is implemented using the prevBtnState, btnState and debounceCheckTime.
The button state machine is split into two parts within the code.
The first part determines if
the button has changed its state (e.g. it was pressed, but now it is released).
When this happens, we track the new state of the button in
prevBtnState.
We also set a time to check when to check back to ensure that the button
is still in this state (i.e. it wasn't a spurious signal). This time is
tracked by the debounceCheckTime variable.
It might be helpful to label this state as the "conditionally pressed" state.
The second part of the state machine is to confirm the press. If the
"system time" as provided by the millis function has passed the
debounceCheckTime
value, then we also check to see if the button state is still the same
as what we observed when we transitioned into the "conditionally pressed"
state. If both of those are true, then we can officially declare that
the button has changed state.
We then check to see if the button was pressed (as opposed to released)
and if it was pressed, then we increment the mode and set the pressEvent
variable to true to register the fact that the button has "officially"
been pressed and is not simply a spurious event.
Following is the final version of the program featuring the state machines. I have also implemented some optimisations of some of the code as described in the video. Again, this looks quite long, but a significant portion of it is comments.
/**
 * MyBlink (State Machine)
 * -------
 *
 * This program resolves the problems in the MyBlinkWithDelay program.
 *
 * The basic problem is that the MyBlinkWithoutDelay program is not great at responding
 * to button presses. This is because of the use of the delay function.
 *
 * The solution to the lack of responsiveness is to get rid of the delay functions.
 * This is achieved by replacing them with a timer based transitioning state machine.
 *
 * What this means is that delay is replaced with a "next step time" value. This tells
 * us **when** we need to do something in the animation. The other thing we need to do is
 * either track what to do when the timer expires or track the current state and move to the
 * new state.
 *
 * So for example in the blink all LEDs together function, we track what to do next when
 * the timer expires. This is handled by the turnOn boolean variable.
 *
 * In the strobe functions, we track which LED to adjust next time. This is because we increment
 * the idx counter at the end of the function. We could just track the current LED that is
 * lit by putting the increment at the top of the function.
 *
 */
const int LED0 = 3;
const int LED1 = 5;
const int LED2 = 6;
const int LED3 = 9;
const int LED4 = 11;

const int BUTTON = 2;

/*
 * Following is the list of pins that you have connected the LEDs to.
 * If you follow my connections, then the LED array will be set
 * correctly. If you have used different pins for the LEDs then
 * you will need to list the pins that you have used in place
 * of my pin numbers.
 */
const int LED [] = {
  LED0, LED1, LED2, LED3, LED4, 12, 13
};

/*
 * Calculate how many LEDs are in the LED array.
 * The formula is the size of the array in bytes - currently 7 elements
 * by 2 bytes per element = 14 bytes.
 * divided by the size of the first element(2 bytes).
 * Results in 14 / 2 = 7 elements. So NUM_LEDS is 7.
 */
const int NUM_LEDS = sizeof(LED) / sizeof(LED[0]);

/**
 * Setup the hardware environment.
 * - All LEDs are set as outputs.
 * - The BUTTON is set as an input.
 */
void setup() {
  for (int idx = 0; idx < NUM_LEDS; idx++) {
    pinMode(LED[idx], OUTPUT);
  }

  pinMode(BUTTON, INPUT);
}


/*
 * Generic function that sets all of the LED's to
 * the specified state (HIGH or LOW).
 */
void setAllLeds(int state) {
  for (int idx = 0; idx < NUM_LEDS; idx++) {
    digitalWrite(LED[idx], state);
  }
}

/**
 * Blink all of the LEDs once.
 * The blink is on for one second and off for one second.
 */
void blinkOnce(boolean initialise) {
static unsigned long nextStepTime = 0;      // The time to take the next step.
static boolean turnOn = true;               // What do we need to do when the timer expires.

  /* There is no initialisation for blinkOnce
   *  An optional initialisation could be to set the turnOn to true (or false)
   *  to ensure that when we switch to this animation, we always set
   *  the LEDs on (or off).
   */

  unsigned long now = millis();             // Get the current time.
  if (now >= nextStepTime) {                // Has the next step time been reached?
    nextStepTime = now + 1000;              // Yes, so calculate a new next step time.

    if (turnOn) {                           // Take the required action
      setAllLeds(HIGH);                     // If turning on, then turn them all on.
    } else {
      setAllLeds(LOW);                      // Otherwise turn them off.
    }
    turnOn = ! turnOn;                      // Next time, we will do the opposite.
  }
}

/*
 * The noACtion function does nothing.
 */
void noAction(boolean initialise) {
  if (initialise) {                         // When switching to this state,
    setAllLeds(LOW);                        // just turn all the LEDs off.
  }
}


/**
 * Strobe the LEDs to the right.
 * In this context, "to the right" means starting with the
 * first (leftmost) LED defined in the array, turn it on
 * and work our way up to the last (rightmost) element.
 */
void strobeRight(boolean initialise) {
static unsigned long nextStepTime = 0;      // The time to take the next step.
static int idx = 0;                         // The LED that is to be turned on when the timer expires.

  if (initialise) {                         // If we are initialising,
    idx = 0;                                // Set the active LED to the first one, and
    setAllLeds(LOW);                        // "clear" the LED display.
  }

  unsigned long now = millis();             // Get the current time.
  if (now >= nextStepTime) {                // Has the next step time been reached?
    nextStepTime = now + 200;               // Yes, so calculate a new next step time.

    digitalWrite(LED[idx], HIGH);           // Turn on the "current" LED
                                            // Turn off the "previous" LED.
    if (idx > 0) {                          // If we are not currently at the leftmost LED.
      digitalWrite(LED[idx - 1], LOW);      // the "previous" LED is the one to the left of the "current" one.
    } else {
      digitalWrite(LED[NUM_LEDS - 1] , LOW);// Otherwise, the "previous" LED is the rightmost one.
    }

    idx = (idx + 1) % NUM_LEDS;             // Calculate the next "current" LED.
  }
}


/**
 * Strobe the LEDs to the left.
 * In this context, "to the left" means starting with the
 * last (rightmost) LED defined in the array, turn it on
 * and work our way down to the fist (leftmost) element.
 */
void strobeLeft(boolean initialise) {
static unsigned long nextStepTime = 0;      // The time to take the next step.
static int idx = NUM_LEDS - 1;              // The LED that is to be turned on when the timer expires.
                                            // Remember, NUM_LEDS is the number of elements in the array (e.g. 7)
                                            // However, the array indices start from zero, so the index value
                                            // of the last LED is only 6. Hence the initial value is NUM_LEDS - 1

  if (initialise) {                         // If we are initialising,
    idx = NUM_LEDS - 1;                     // Set the active LED to the last one, and
    setAllLeds(LOW);                        // "clear" the LED display.
  }

  unsigned long now = millis();             // Get the current time.
  if (now >= nextStepTime) {                // Has the next step time been reached?
    nextStepTime = now + 200;               // Yes, so calculate a new next step time.

    digitalWrite(LED[idx], HIGH);           // Turn on the "current" LED
                                            // Turn off the "previous" LED.
    if (idx == NUM_LEDS - 1) {              // If we **are** currently at the rightmost LED.
      digitalWrite(LED[0], LOW);            // Turn off the first (leftmost) LED
    } else {
      digitalWrite(LED[idx + 1], LOW);      // Otherwise, the "previous" LED is the next higher one in the LED array.
    }
            // Calculate the next LED to turn on when the timer next expires.
    idx = idx - 1;                          // Move the idx to the left.
    if (idx < 0) {                          // If we have passed the leftmost LED,
      idx = NUM_LEDS - 1;                   // reset the idx to the index of the rightmost LED in our array.
    }
  }
}


void loop() {
  /*
   * The following variables are declared as static.
   * What this means is that they are initialised one time only.
   * The value that they are set to will be remembered across
   * subsequent calls to loop.
   */
static int mode = 0;                // Defines what animation we are currently performing on the LEDs
static int prevBtnState = HIGH;     // Tracks the state of the button the last time we checked.
static int btnState = prevBtnState; // Tracks the "official state" of the button.
static unsigned long debounceCheckTime = 0;   // When to check the button to determine if we need to
                                              // change its "official state" or not.

boolean pressEvent = false;

  /*
   * If you are interested in trying to emulate
   * the switch bounce problem, uncomment the following block of code.
   *
   * Make sure to comment out the following block of code which correctly handles the button press.
   */
//  int btnState = digitalRead(BUTTON);
//  if (btnState != prevBtnState) {
//    prevBtnState = btnState;
////    delay(10);                  // This delay - if uncommented - will debounce the button.
//                                  // For this program, this delay is good enough, but I wanted
//                                  // to show how to use a state machine to debounce the button as
//                                  // there will be times when this is **not** good enough.
//    if (btnState == LOW) {
//      pressEvent = true;
//      mode = mode + 1;
//      if (mode >= 4) {
//        mode = 0;
//      }
//    }
//  }

  /*
   * If you want to recreate the bounce problem, uncomment the above block of code
   *
   * If you enable the above code, make sure you comment out these next two if statements.
   */
  unsigned long now = millis();             // Get the current time.
  int btnStateWrk = digitalRead(BUTTON);    // Read the button.
  if (btnStateWrk != prevBtnState) {        // Has it changed since last time loop was invoked? i.e. did it just change?
    prevBtnState = btnStateWrk;             // Yes, so track this new state for next time through the loop (which will be the "previous" state).
    debounceCheckTime = now + 10;           // Determine when to check that the button is still in this new state - and thus debounced.
  }
                                            // Is the official button state different from the previous one?
                                            // And, is it time to check if the debounce timer has expired?
  if (btnState != prevBtnState && now >= debounceCheckTime) {
    btnState = btnStateWrk;                 // Yes, so record the new official state - the button has now been debounced.
                                            // The next part of the code responds to the fact that the button has changed state.
    if (btnState == LOW) {                  // Has the button been pressed? (We do not care in this program about button releases)
      pressEvent = true;                    // Yes it has, so indicate that the button has been pressed - this will be used to initialse the new animation
      mode = (mode + 1) % 4;                // Increment the mode and wrap around based upon the fact that we only have 4 animations.
                                            // The % sign used here is the Modulo or Modulus operator. It returns the remainder after performing an arithmetic divide operation.
    }
  }

      // Activate the current animation - pass the pressEvent value which is set to true if the button
      // was just "officially" declared to be pressed.
      // When the button is "officially" pressed, we want to give the animation an opportunity to initialise itself.
  if (mode == 0) {
    blinkOnce(pressEvent);
  } else if (mode == 1) {
    strobeRight(pressEvent);
  } else if (mode == 2) {
    strobeLeft (pressEvent);
  } else {
    noAction(pressEvent);
  }
}
Optional exercises
Add some of your own animations to the code. Use the state machine method to implement the new animations.
Following are some suggestions for you to try:
Knight Rider
The new animation is a combination of the strobeLeft and strobeRight functions. When the LED reaches the end of its travel along the LEDs, instead of jumping back to the beginning, reverse its direction.
For example, instead of starting at idx = 0, incrementing one by one until reaching NUM_LEDS - 1 and then reset back to idx = 0, start counting down until you get to idx == 0, then start counting back up and so on.
The effect will be that the LED will move backwards and forwards without jumping. Who is Knight Rider? It was an old TV series featuring a "smart car" that had this same LED effect built in to it.
Blinky
Randomly turn on a single LED for a random period of time. When the time expires:
- turn it off,
- pick a new random LED, which could be the same one,
- turn it on for a random period of time.
Note that there are two ways that you can use the random function.
Twinkle, Twinkle
Same as blinky, but randomly turn all of the LEDs on or off.
Each LED must be individually managed and turned on or off for differing random periods of time at different times.